“Marionette Maps” is an on-going series on building a loosely coupled, configuration driven map viewer using Marionette.js. Read Part 1, Part 2, Part 3.
Since the last post I wired in a few more sections of the app which were more or less copies of other sections. When clicked, the “Historic Fires” item in the main menu now shows a list of years for which data is available, and raises an event that the map will eventually respond to. Check out the code for details, but it’s basically a Layout, with a child region that is filled by a CollectionView that grinds out ItemViews. The click event on the ItemViews grab the model and raise the event. Cake.
Adding the Esri Geocoder
The search button in the upper left allows a user to search for an address or point of interest. Since we are working with Esri technology for this series, I created a EsriGeocodeSearchModule, and since we are building a loosely coupled application, this module does not interact with the map directly. As mentioned earlier in the series, we will use Events to send messages between the components.
Although there is a handy “geocode-widget” available from Esri, the calls to the geocode service are super simple, so I just used jQuery.ajax. The code is dead-simple as shown below:
When we get the results back, we do one of two things:
a) if there is exactly one result, we simply raise the Map:CenterAt event, passing in the x,y returned from the service.
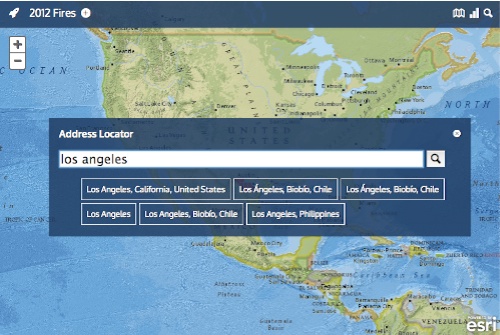
b) if there are any other number of results, we load them into a collection, and hand that to a Marionette.CollectionView to render into the region in our Marionette.Layout.
Here is a screen cap showing the geocode view, following a search which returned multiple matches.

My point about “any other number of results” was on purpose. My first thought was I’d have to handle the case of zero results separately from handling more than one. But – here is an interesting thing – you can define an “emptyView” for a Marionette.CollectionView, and if the collection is empty, the CollectionView will render the emptyView instead. This is a great example of code being designed “to do the right thing”. In our code, the enptyView is just a simple itemView whose template just has a message.
The only other interesting thing I did with this example was to make the magnifying glass on the search button rotate while the ajax request is running. I wanted some sort of activity indicator, and this seemed like a good time to play with some CSS3 transitions – right now these are only working in webkit, but it looks like I can make them work across the board in good browsers. Moving on!
Adding the Map
So – I’ve intentionally left the map out as long as possible. The main reason was to force myself to setup all the events and interactions BEFORE the map was in place, thus ensuring that the map did not “leak” into other ares of the app due to convenience.
The EsriMapModule follows the same pattern as all the others – it simply sets up the map during the Controller.initialize function. Recall that we really want to make this app as configurable as possible, so we pass in the base maps and operational layers via the application configuration. This makes the initialization pretty simple – parse out the layers, check out their “type”,instantiate the appropriate type of Layer in the Esri javascript library, and add them to the map, setting the visibility along the way – here is a snipped showing those two functions:
The next thing I wired up were the events. At this point we have 6 events to listen for:
- Map:ShowControls – show the + / – zooming controls
- Map:HideControls – hide the + / – zooming controls. used when the menu pops down
- Map:SetBasemap – raised by our layer list – tells the map what basemap to show
- Map:SetLayerVisibility – raised by our layer list – set the visibility of an operational layer
- Map:FireLayer:DataChanged – updates the Fire Layer when new data has been loaded. More in the next post
Next Steps: Adding Wildfires
The heart of this application is showing wildfires from Geomac.gov. Their main map service (http://wildfire.cr.usgs.gov/ArcGIS/rest/services/geomac_dyn/MapServer) breaks out the fires across a number of layers.
- Current fires (aka “burning”) are in layer 0, with the associated perimeters (if any) in layer 1.
- All fires for the current year (active and inactive) are in layer 4.
- All perimeters from all previous years, are in layer 5,
- Layers 7 through 17 hold historic fires (points) from 2012 back to 2007.
In our app we want to have the following options:
a) View Current Fires and Perimeters
b) View Historic Fires, by year, back to 2005.
The layout of this service is pretty good for some uses, but for our app it would have been much easier if they had all the wildfires in one layer, and all the perimeters in another. Then switching between “years” would simply mean changing the “definition query” (essentially a “where-clause”) used when requesting the map image. But, that’s not the case, and we don’t control the data, so we have to live with it.
Additionally, the cartography likely makes sense for fire fighters, but it’s not too great for the public, so using the MapServices directly is not going to work for us. We need more control.
How I tackle this will be the subject of the next (and final!) post in this series.
Code
The code for this post is tagged v0.0.4 on github
Latest version of the app can be seen at http://dbouwman.github.com/geomacmapper